
Great kung pao chicken lives or dies on one thing: the sauce ratio. Restaurants nail it because they measure by muscle memory; home cooks miss it because most recipes bury the numbers under an ingredient wall. This version gives you the ratio first, then a 20-minute method that works in a regular skillet, no wok required. The result tastes like a good Sichuan takeout order, tightened and glossy, with real chile fragrance instead of dull heat.
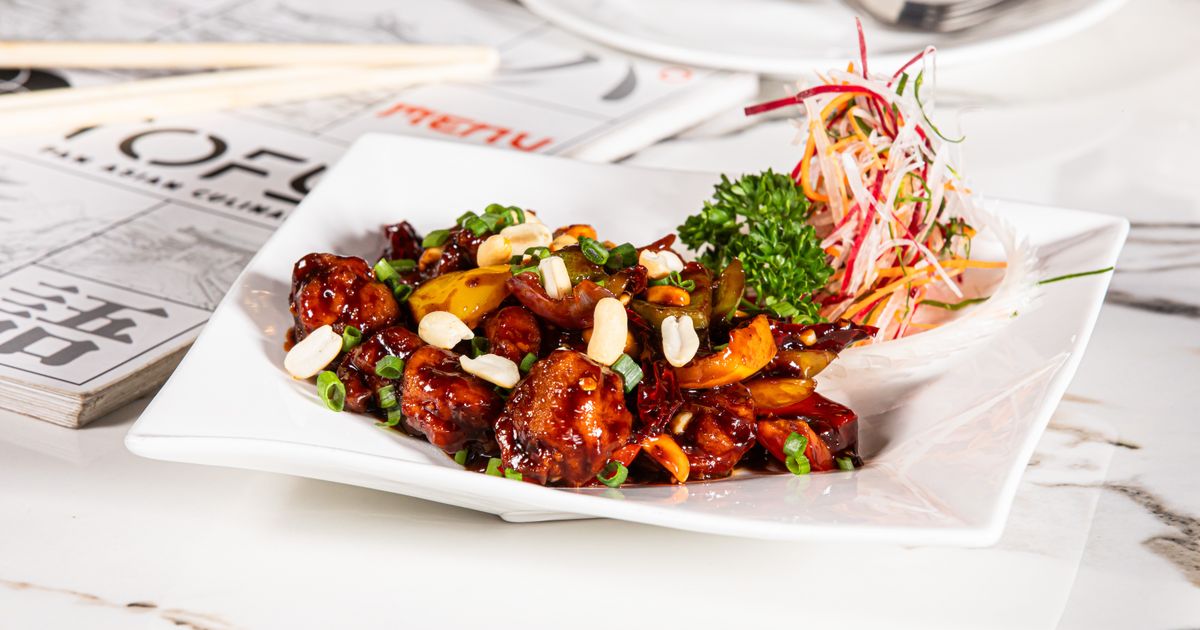
Kung pao chicken is a Sichuan stir-fry of cubed chicken, roasted peanuts, dried red chilies, and Sichuan peppercorns bound in a sweet-sour-salty sauce. The dish takes about 20 minutes and hinges on a 2:1:2 ratio of light soy sauce, Chinese black vinegar, and sugar (in teaspoons or tablespoons, kept proportional). Toast the peppercorns and chilies in dry oil first, sear the chicken hot and fast, then flash the sauce so it thickens in seconds.
Jump to
The sauce ratio that makes or breaks it
The reason most homemade kung pao chicken tastes flat is the sauce, not the technique. Restaurants build the sauce on a fixed backbone: light soy for salt, black vinegar for sweet-tart depth, sugar to round the vinegar, plus a tiny cornstarch slurry for the glossy cling. Everything else is aroma.
Below is the exact ratio I use for 4 servings. Whisk it in a small bowl before the pan gets hot, because once you start stir-frying you have 30 seconds, not 3 minutes.
| Ingredient | Amount | What it does |
|---|---|---|
| Light soy sauce | 2 tbsp | Salt and umami base |
| Chinese black vinegar (Chinkiang) | 1 tbsp | Defines the sweet-tart profile |
| Sugar (light brown or white) | 2 tsp | Balances vinegar sharpness |
| Shaoxing wine | 1 tbsp | Rounds the sauce, adds aromatic depth |
| Dark soy sauce | 1 tsp | Color, no extra salt |
| Cornstarch | 1 tsp | Glossy, syrupy coat instead of watery pool |
| Chicken stock or water | 3 tbsp | Loosens the sauce so it coats evenly |
| Toasted sesame oil | 1 tsp | Finishing aroma, added off heat |
Ingredients and what you can swap
Chicken thighs beat breast here by a wide margin. Thigh meat stays juicy at the high sear temperature this dish needs, and the small dice cooks through in 90 seconds. If you only have breast, velvet it first with cornstarch and egg white, then follow the recipe.
Chicken and marinade
- 1.25 lb / 570 g boneless skinless chicken thighs, cut into 3/4-inch cubes
- 1 tbsp Shaoxing wine
- 1 tbsp light soy sauce
- 1 tbsp cornstarch
- 1 tsp neutral oil
Sauce (whisk in bowl)
- 2 tbsp light soy sauce
- 1 tbsp Chinese black vinegar
- 2 tsp sugar
- 1 tbsp Shaoxing wine
- 1 tsp dark soy sauce
- 1 tsp cornstarch
- 3 tbsp stock or water
- 1 tsp toasted sesame oil
Stir-fry
- 3 tbsp neutral oil (peanut or grapeseed)
- 8 to 10 dried red chilies, halved, most seeds shaken out
- 1.5 tsp Sichuan peppercorns
- 4 garlic cloves, thinly sliced
- 1 inch fresh ginger, minced
- 4 scallions, whites in 1-inch pieces, greens sliced thin
- 1/2 cup roasted unsalted peanuts
Swap notes. No Shaoxing wine? Dry sherry works one-for-one. No Sichuan peppercorns? Toast 1/2 teaspoon of whole white peppercorns with a pinch of coriander seed; you lose the numbing tingle (that’s the mala effect) but keep the aromatic base. No dried Sichuan chilies? Dried arbol or Thai bird chilies are the closest match by heat and shape. If you only have chicken breast on hand, our guide to cooking chicken breast on the stove covers the velveting technique in detail.
How to make kung pao chicken, step by step
The full cook takes eight minutes once the pan is hot. Read through the steps before you turn on the burner, because there is no time to check the recipe mid-fry.
- Marinate the chicken (15 min)Toss the cubed thighs with the Shaoxing wine, light soy sauce, cornstarch, and 1 teaspoon of oil. Let it sit at room temperature while you prep everything else. The cornstarch forms a thin coat that seals in juice at the high heat.
- Whisk the sauce and prep the aromaticsCombine every sauce ingredient in a small bowl. Slice garlic, mince ginger, cut scallion whites and greens, and halve the dried chilies. Everything goes near the stove within arm’s reach.
- Bloom the chilies and peppercornsHeat 1 tablespoon of oil in a large skillet or wok over medium heat. Add the Sichuan peppercorns and dried chilies. Toast for 30 to 45 seconds until fragrant and the chilies darken one shade, then scoop them out onto a plate. This keeps them from burning during the sear. Oil: 300°F / 150°C
- Sear the chicken hot and fastAdd the remaining 2 tablespoons of oil, crank the heat to high. When the oil shimmers and just starts to smoke 400°F / 200°C, spread the chicken in a single layer. Do not stir for 90 seconds, then toss and cook another 60 to 90 seconds until the surface is caramelized and the internal temperature hits 165°F / 74°C.
- Add aromatics, then the saucePush the chicken to one side. Add the garlic, ginger, and scallion whites, stir for 15 seconds. Return the toasted chilies and peppercorns. Give the sauce one final whisk (cornstarch settles), pour it in, and toss constantly for 30 seconds. It will go from thin to syrupy fast.
- Finish with peanuts and scallion greensKill the heat. Fold in the peanuts and half the scallion greens. Slide onto a warm plate, top with the rest of the greens. Serve immediately over steamed rice, because the sauce keeps thickening as it cools.
Why your kung pao chicken turns out wrong
In my kitchen tests, three failure modes explain almost every batch that misses the mark. Fix these and the recipe becomes repeatable.
Storage and reheating
Common questions
Is kung pao chicken very spicy?
Not aggressively. The dried chilies are there for fragrance and mild heat, not searing burn, and most home versions land at a comfortable medium. Shake more seeds out of the chilies for a milder plate, or leave them in and add two extra chilies if you want it fierce.
Can I make kung pao chicken without Sichuan peppercorns?
You can, but you lose the mala tingle that gives the dish its identity. The closest substitute is 1/2 teaspoon of toasted whole white peppercorns plus a small pinch of coriander seed, which recreates the aromatic backbone without the numbing sensation. If you only have black pepper, the result will be a pleasant sweet-sour stir-fry, just not authentically Sichuan.
Should I use chicken thighs or breast for kung pao chicken?
Thighs almost always win. They tolerate the high sear temperature without drying, and the fat carries the sauce flavors. Use breast only if you velvet it first: toss the cubes with 1 teaspoon cornstarch and 1 tablespoon egg white for 15 minutes before cooking, which shields the lean meat during the fast sear.
How do I stop my kung pao chicken sauce from being watery?
Three fixes cover it. Whisk the sauce again right before pouring, because cornstarch settles fast. Add it to a screaming-hot pan, not a warm one, so it thickens on contact. If it still looks loose after 30 seconds, sprinkle in a pinch of cornstarch mixed with a teaspoon of cold water and toss for another 10 seconds.

Easy Kung Pao Chicken Recipe (Better Than Takeout)
A Sichuan stir-fry of cubed chicken, roasted peanuts, dried red chilies, and Sichuan peppercorns bound in a sweet-sour-salty sauce
- 1.25 lb lb boneless skinless chicken thighs cut into 3/4-inch cubes
- 1 tbsp tbsp Shaoxing wine
- 1 tbsp tbsp light soy sauce
- 1 tbsp tbsp cornstarch
- 1 tsp tsp neutral oil
- 2 tbsp tbsp light soy sauce
- 1 tbsp tbsp Chinese black vinegar
- 2 tsp tsp sugar
- 1 tbsp tbsp Shaoxing wine
- 1 tsp tsp dark soy sauce
- 1 tsp tsp cornstarch
- 3 tbsp tbsp stock or water
- 1 tsp tsp toasted sesame oil
- 3 tbsp tbsp neutral oil
- 8-10 dried red chilies halved, most seeds shaken out
- 1.5 tsp tsp Sichuan peppercorns
- 4 garlic cloves thinly sliced
- 1 inch inch fresh ginger minced
- 4 scallions whites in 1-inch pieces, greens sliced thin
- 1/2 cup cup roasted unsalted peanuts
Marinate the chicken
Toss the cubed thighs with the Shaoxing wine, light soy sauce, cornstarch, and 1 teaspoon of oil. Let it sit at room temperature while you prep everything else.
Whisk the sauce and prep the aromatics
Combine every sauce ingredient in a small bowl. Slice garlic, mince ginger, cut scallion whites and greens, and halve the dried chilies. Everything goes near the stove within arm's reach.
Bloom the chilies and peppercorns
Heat 1 tablespoon of oil in a large skillet or wok over medium heat. Add the Sichuan peppercorns and dried chilies. Toast for 30 to 45 seconds until fragrant and the chilies darken one shade, then scoop them out onto a plate.
Sear the chicken hot and fast
Add the remaining 2 tablespoons of oil, crank the heat to high. When the oil shimmers and just starts to smoke, spread the chicken in a single layer. Do not stir for 90 seconds, then toss and cook another 60 to 90 seconds until the surface is caramelized and the internal temperature hits 165°F / 74°C.
Add aromatics, then the sauce
Push the chicken to one side. Add the garlic, ginger, and scallion whites, stir for 15 seconds. Return the toasted chilies and peppercorns. Give the sauce one final whisk, pour it in, and toss constantly for 30 seconds.
Finish with peanuts and scallion greens
Kill the heat. Fold in the peanuts and half the scallion greens. Slide onto a warm plate, top with the rest of the greens. Serve immediately over steamed rice.
- Large skillet or wok
The sauce ratio is crucial, and the dish is best made with Sichuan peppercorns and dried red chilies
Did You Try Our Recipe ?
Scrumptious
My husband (who is extremely picky) loved the liver & onions so much!! I didn’t have any beef broth or Sherry so I used about a tbl of Worcestershire and 1/4 c of white wine …..it was scrumptious
Response from MeatRecipesBox
Oh wow, I’m so happy to hear that!! 😍 I love that you made it work with what you had on hand — Worcestershire and white wine sound like a delicious twist. So glad your husband enjoyed it, especially being picky! Thank you for sharing your version, it makes me smile knowing it turned out scrumptious!
This was amazing
This recipe turned out really amazing! It’s juicy and spiced deliciously. I definitely would use less of the spicy pepper next time, but it really was delicious and I don’t think I’ll make chicken legs any other way from now on.!
Response from MeatRecipesBox
Thank you for taking the time to leave such a thoughtful review. I’m really glad to hear the recipe turned out juicy and full of flavor for you. That’s exactly what I was hoping for when putting it together. Good call on the spicy pepper as well. Adjusting the heat level to your own taste is always the best approach, and using a little less next time should make it just right for you. I really appreciate you trying the recipe and sharing your experience. It’s great to know it worked so well for you.
I Didn’t Expect This Cornbeef Hash Recipe to Taste This Good!!
One skillet. A handful of simple ingredients. Thirty minutes on the clock. And somehow… I ended up with the crispiest, most comforting cornbeef hash recipe I’ve made in years.
I wasn’t expecting much—just a quick, no-fuss meal. But that first bite? Crispy edges, tender potatoes, smoky corned beef, a little kick of pepper. It tasted like something straight off a cozy diner griddle.
Honestly, it caught me off guard—in the best way. Here’s why this simple skillet completely won me over.


